Serial interface - bit transmission - on byte wise manner
This page is targeted TTL serial. See index.html for further explanation.
this page is for getting better understanding and a help if you must debug by oscilloscope
In short:
A serial interface can transmit and receive characters (normally 8 bit char- can be 5,6,7,8)
Often it is on a 0-5V or 0-3.3V line (aka TTL levels also if its 1.8V)
two wires a common TX/RX and a ground
tx-device1 –> rx-device2
tx-device2 –> rx-device1
ground device1 <–> ground device2
Data as bytes is transmitted as a sequence of bits surrounded with a start and a stop bit
Bit and bytes on the wire - transmission
Data is normally 8 bits (can be 5,6,7,8)
Surrounded by a startbit and stopbit and maybe a parity bit(odd,even,non) before stopbit
Idle level is high (eg 5V, 3.3V dependig on arch)
bit value 1 is high (eg 5V, 3.3V dependig on arch)
bit value 0 is low (0V)
startbit starts when line goes from high to low eg startbit is 0V or logical 0
stopbit starts when line goes from low to high eg startbit is 5V or logical 1
 |
Transmit examples
Transmission goes from left to right in the figures
Each bit has a fixed length in time
9600 baud -> duration 1 bit = 1/9600 sec ~= 104 micro sec
1 byte (incl start and stop bit - 8+2) takes 1040 micro sec ~= 1 milli sec
max capacity <= 961 bytes pr second
115200 baud -> duration 1 bit = 1/115200 sec ~= 8.68 micro sec
1 byte (incl start and stop bit - 8+2) takes 86,8 micro sec
max capacity <= 11520 bytes pr second
So if you do have pulled receive code this means you have to call code like

int ch = getByte();  // -1 if nothing for you otherwise 0x00-0xff

and do this at least every 104.2 microsec for 9600 baud
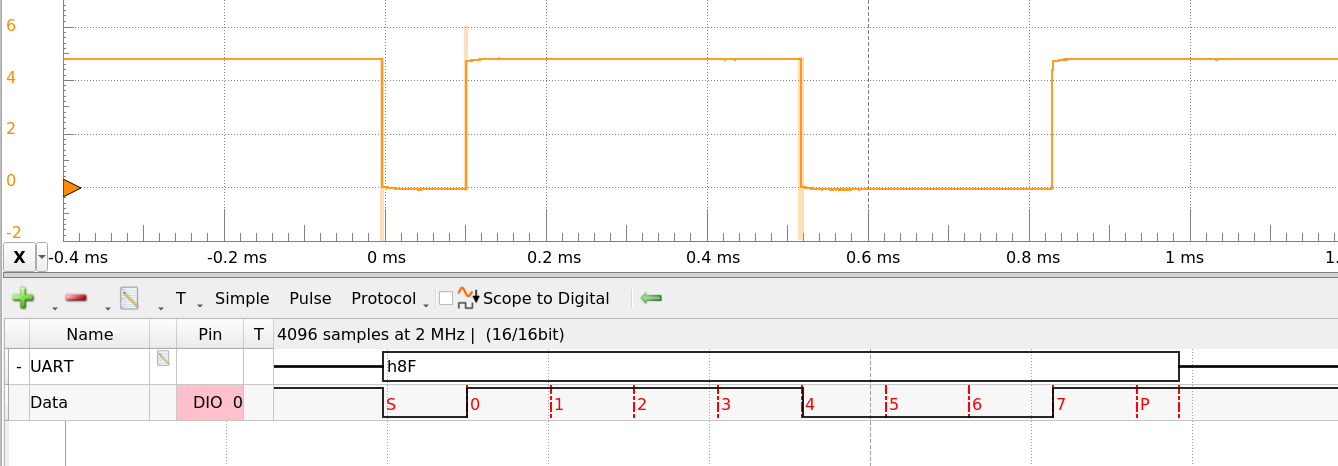
You can see at 0 msec line goes low for 1 msec(startbit - which is low) and after that the following 8 bit are HHLLLHL and last H(stopbit)
You can see below in figures that TX order is least significant bit first
Low level (0V) = logic 0 -- High level (5V) = logic 1

-We want to TX 0X7C (binary 0111.1100)

- TX'ed as <startbit>"0X7C" with lsb first<stopbit>

-  which is     00011110111
                         ^^- 2 bit idle - can be less
                        ^--- stopbit
                       ^---- msb bit is 0x7C
                 ^---------- lsb bit in 0X7C
                ^------------ startbit
You can see at 0 msec line goes low for 1 msec(startbit - which is low) and after that the following 8 bit are HHLLLHL and last H(stopbit)
Images is recorded by a *Analog Discovery 2’
Startbit is marked 'S’, Stopbit 'P’, and paritybit(if present) 'X’ in all the following images.
below 0x7C at 9600 baud
 |
below 0x8F at 9600 baud
 |
below 0x55 at 9600 baud - with bit duration measured(104.1 microsec)
 |
Note
You may find serial interfaces where
bit value 1 is low and bit value i high
startbit is high
stop bit is low
and therefore idle level is low
But these implementation is rare.
Parity
Normally we just transmit 8 databits but we can add a prirty bit after the 8 databit:
Parity
None - no parity
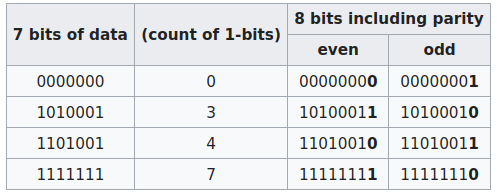
Even - extra bit which is high if a odd number of 1's in the databit
Odd - extra bit which is high if a even number of 1's in the databit
From https://en.wikipedia.org/wiki/Parity_bit
NB we do normally use 8 bit for data (a byte) but parity rule is the same
 |
Howto parity bit
In Arduino world:s
All at 9600 baud
- standard - no parity bit - Serial.begin(9600);
- odd parity - 8 bit data  - Serial.begin(9600,SERIAL_8O1);
- even parity- 5 bit data  - Serial.begin(9600,SERIAL_5E1);

8: 8 databit - can be 5,6,7,8
O: odd parity
E: even parity


My test code

void setup() {
  Serial.begin(9600,SERIAL_8E1);
}

void loop() {
  Serial.write(0xa1);
  delay(100);
}
In the following examples we use Even parity.
The parity bit is marked 'X’
0xa5, even parity - 9600 baud
We do TX 0xa5 or 1010.0101 which is 4 high bits so even parity is here 0
Parity bit is by analog discovery marked 'X’,startbi 'S’ and stopbit 'P’
 |
0xa1, even parity - 9600 baud
We do TX 0xa1 or 1010.0001 which is 3 high bits so even parity is here 1
 |

